Easy Setup menu item
You can scan for unused frequencies using the Easy Setup menu item.
Switch off all transmitters before you perform the scan. If transmitters are still switched on, they are detected as unavailable frequencies and the frequencies that are actually available cannot then be used.
The squelch threshold setting influences the result. Set the squelch threshold to a low level for as many frequencies as possible, and to a high level for as many safe frequencies as possible (Squelch menu item).
To open the Easy Setup menu item:
- On the home screen, press the SET button to open the operating menu.
- Press the UP or DOWN button until the Easy Setup menu item appears in the selection frame.
- Press the SET button to open the menu item.
-
Adjust the settings as desired.
Scan New List
- Select Scan New List to scan for unused frequencies.
-
Press the SET button to start the scan.
The frequency range of the receiver is scanned. As a result, the number of unused frequencies is displayed for every frequency bank.
- Press the UP or DOWN buttons to select a frequency bank.
- Press the SET button to confirm your selection.
- Press the UP or DOWN buttons to select an unused frequency from the selected bank.
- Press the SET button to save the changes you made to the settings. OR
- Press the ESC button to cancel the entry without saving the setting.
Current List
- Select Current List to show the list of unused frequencies from the last scan.
Reset
- Select Reset List to delete the list of unused frequencies.
Performing multi-channel frequency setup
As an alternative to the following procedure, multi-channel frequency setup can also be performed using the Sennheiser Wireless Systems Manager (WSM) software.
For more information about controlling devices via the Sennheiser Wireless Systems Manager software, refer to the instruction manual for the software.
You can download the software here: sennheiser.com/wsm.
-
To perform the automatic frequency setup for multiple radio links simultaneously:
Connect all of the SR IEM G4 transmitters to one network using a network switch. See Creating a data network.
The automatic frequency setup function only works for transmitters in the same frequency range. Transmitters in a different frequency range are not included.
-
Please note that all transmitters must be in the same IP address range.
- The IP addresses can be automatically assigned if there is a DHCP server in the network.
- If there is no DHCP server in the network, the IP addresses must be assigned manually. See Advanced > IP Address menu item.
- Assign the IP addresses for all transmitters in the 192.168.x.x range (the link-local range 169.254.x.x is also a possible alternative).
-
Open the Easy Setup menu item on one of the transmitters.
The Mute RF For Connected Devices? message appears.
-
Press the jog dial to confirm the message and deactivate the radio signal for all connected transmitters.
All connected transmitters in the same frequency range will switch to Easy Setup Sync mode.
-
Perform a frequency scan on an EK IEM G4 portable receiver as described above.
- From the scan results on the receiver, select a frequency bank with enough free channels.
-
Hold the infrared interface of the EK IEM G4 receiver in front of the infrared interface of an SR IEM G4 transmitter to transfer the scan results from the receiver to this transmitter.

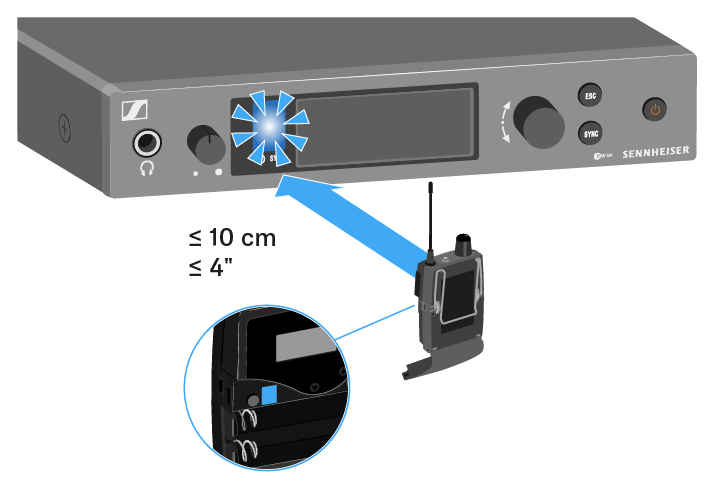
The selected transmitter becomes the master transmitter.The display panels of the other transmitters will display the message Assign New Frequency?.
Receivers with non-compatible frequency ranges will not display a message.
-
Select an unused frequency for one of the connected transmitters on the master transmitter.
The frequency selected on the master transmitter will also be shown on the display panel of the connected transmitters.
- Press the jog dial (SET) on the particular transmitter to save your selected frequency and synchronize it with the corresponding receiver at a later point (see Synchronizing devices). OR
- Press the SYNC button to synchronize the selected frequency with the receiver immediately.
- Use this procedure to assign an unused frequency to all connected transmitters, one after another.
-
For the last step, assign a frequency to the master transmitter.
This completes the multi-channel frequency setup.