Variant 2: installed flush with Ceiling Tile Element in a dropped/coffered ceiling
The TeamConnect Ceiling Medium can be installed flush in closed ceilings with the Ceiling Tile Element without having to saw out an existing ceiling panel.
For this purpose, the TCC M CTFP-W or TCC M CT-W product variant is required. When flush mounting, do not install the TeamConnect Ceiling Medium directly next to lights or other electrical devices in the ceiling.
NOTICE
Danger of property damage if the product should fall
If mounted incorrectly, the product may fall.
When installing in the ceiling, always use additional means to secure the TeamConnect Ceiling Medium against falling, e.g.
with the TCC M SK ceiling suspension kit included in the scope of delivery (see Variant 4: suspended from the ceiling) and additionally
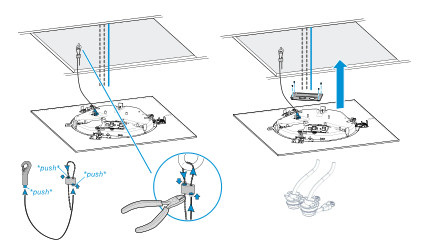
with the supplied installation rope, which is attached to a ceiling hook and the top of the microphone.
Attaching the ceiling flush mount kit
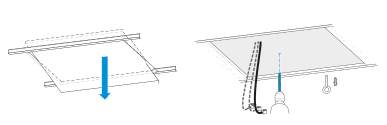
Remove a tile from the ceiling.
Using a suitable anchor, insert an eye bolt into the ceiling to attach the installation rope.
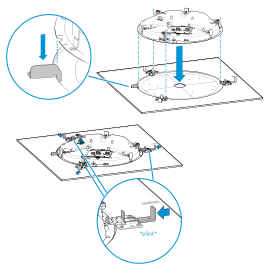
Insert the microphone into the Ceiling Tile panel. In this context, only one position is possible: the metal lug of the panel must be inserted into the corresponding recess on the microphone, as shown in the illustration.
The microphone must then be secured using the three latches on the panel. These must snap into place audibly with a "click".
Securing and connecting the microphone
Fit the installation rope as shown and attach it to the housing and microphone.