
Operating the microphone
| NOTICE | |
|---|---|
Actuating the switches directivity 4, pad 5 and low-cut/roll-off 3 can introduce noise into the audio signal of the microphone.
Therefore, before actuating the switches, mute the microphone or reduce the volume.
Adjusting the low-cut/roll-off filtern
-
Set the low-cut/roll-off switch 3 to the desired position:
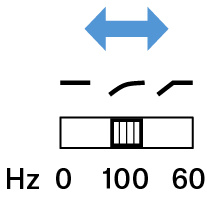

- off
- linear frequency response

- Roll-off, -6 dB/oct., cut-off frequency: 100 Hz
- compensates for the bass boost due to proximity effect

- Low-cut, -18 dB/oct, cut-off frequency: 60 Hz
- eliminates low-frequency noise such as impact sound, fan noise, etc.
- off
Adjusting the pick-up pattern
-
Set the directivity switch 4 to the desired position:


omni-directional 
wide cardioid 
cardioid 
super-cardioid 
figure-of-eight
Adjusting the attenuation
-
Set the pad switch 5 to the desired position:
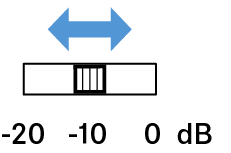
0 dB- No attenuation
-10 dB- Reduces the sensitivity of the microphone capsule by 10 dB
- increases the maximum sound pressure level
-20 dB- Reduces the sensitivity of the microphone capsule by 10 dB
- increases the maximum sound pressure level
- Additionally reduces the output level by 10 dB
- avoids overloading the microphone amplifiers